
Nej, usch! Nu var det ju sjukt länge sedan jag bloggade. Som tur är betyder inte det att jag har slutat pyssla helt och hållet, jag har bara inte bloggat om det. Så mina senaste projekt kommer att dyka upp här den närmsta tiden. Tänkte gottgöra er genom att lägga ut en egenkomponerad virkbeskrivning i dag.

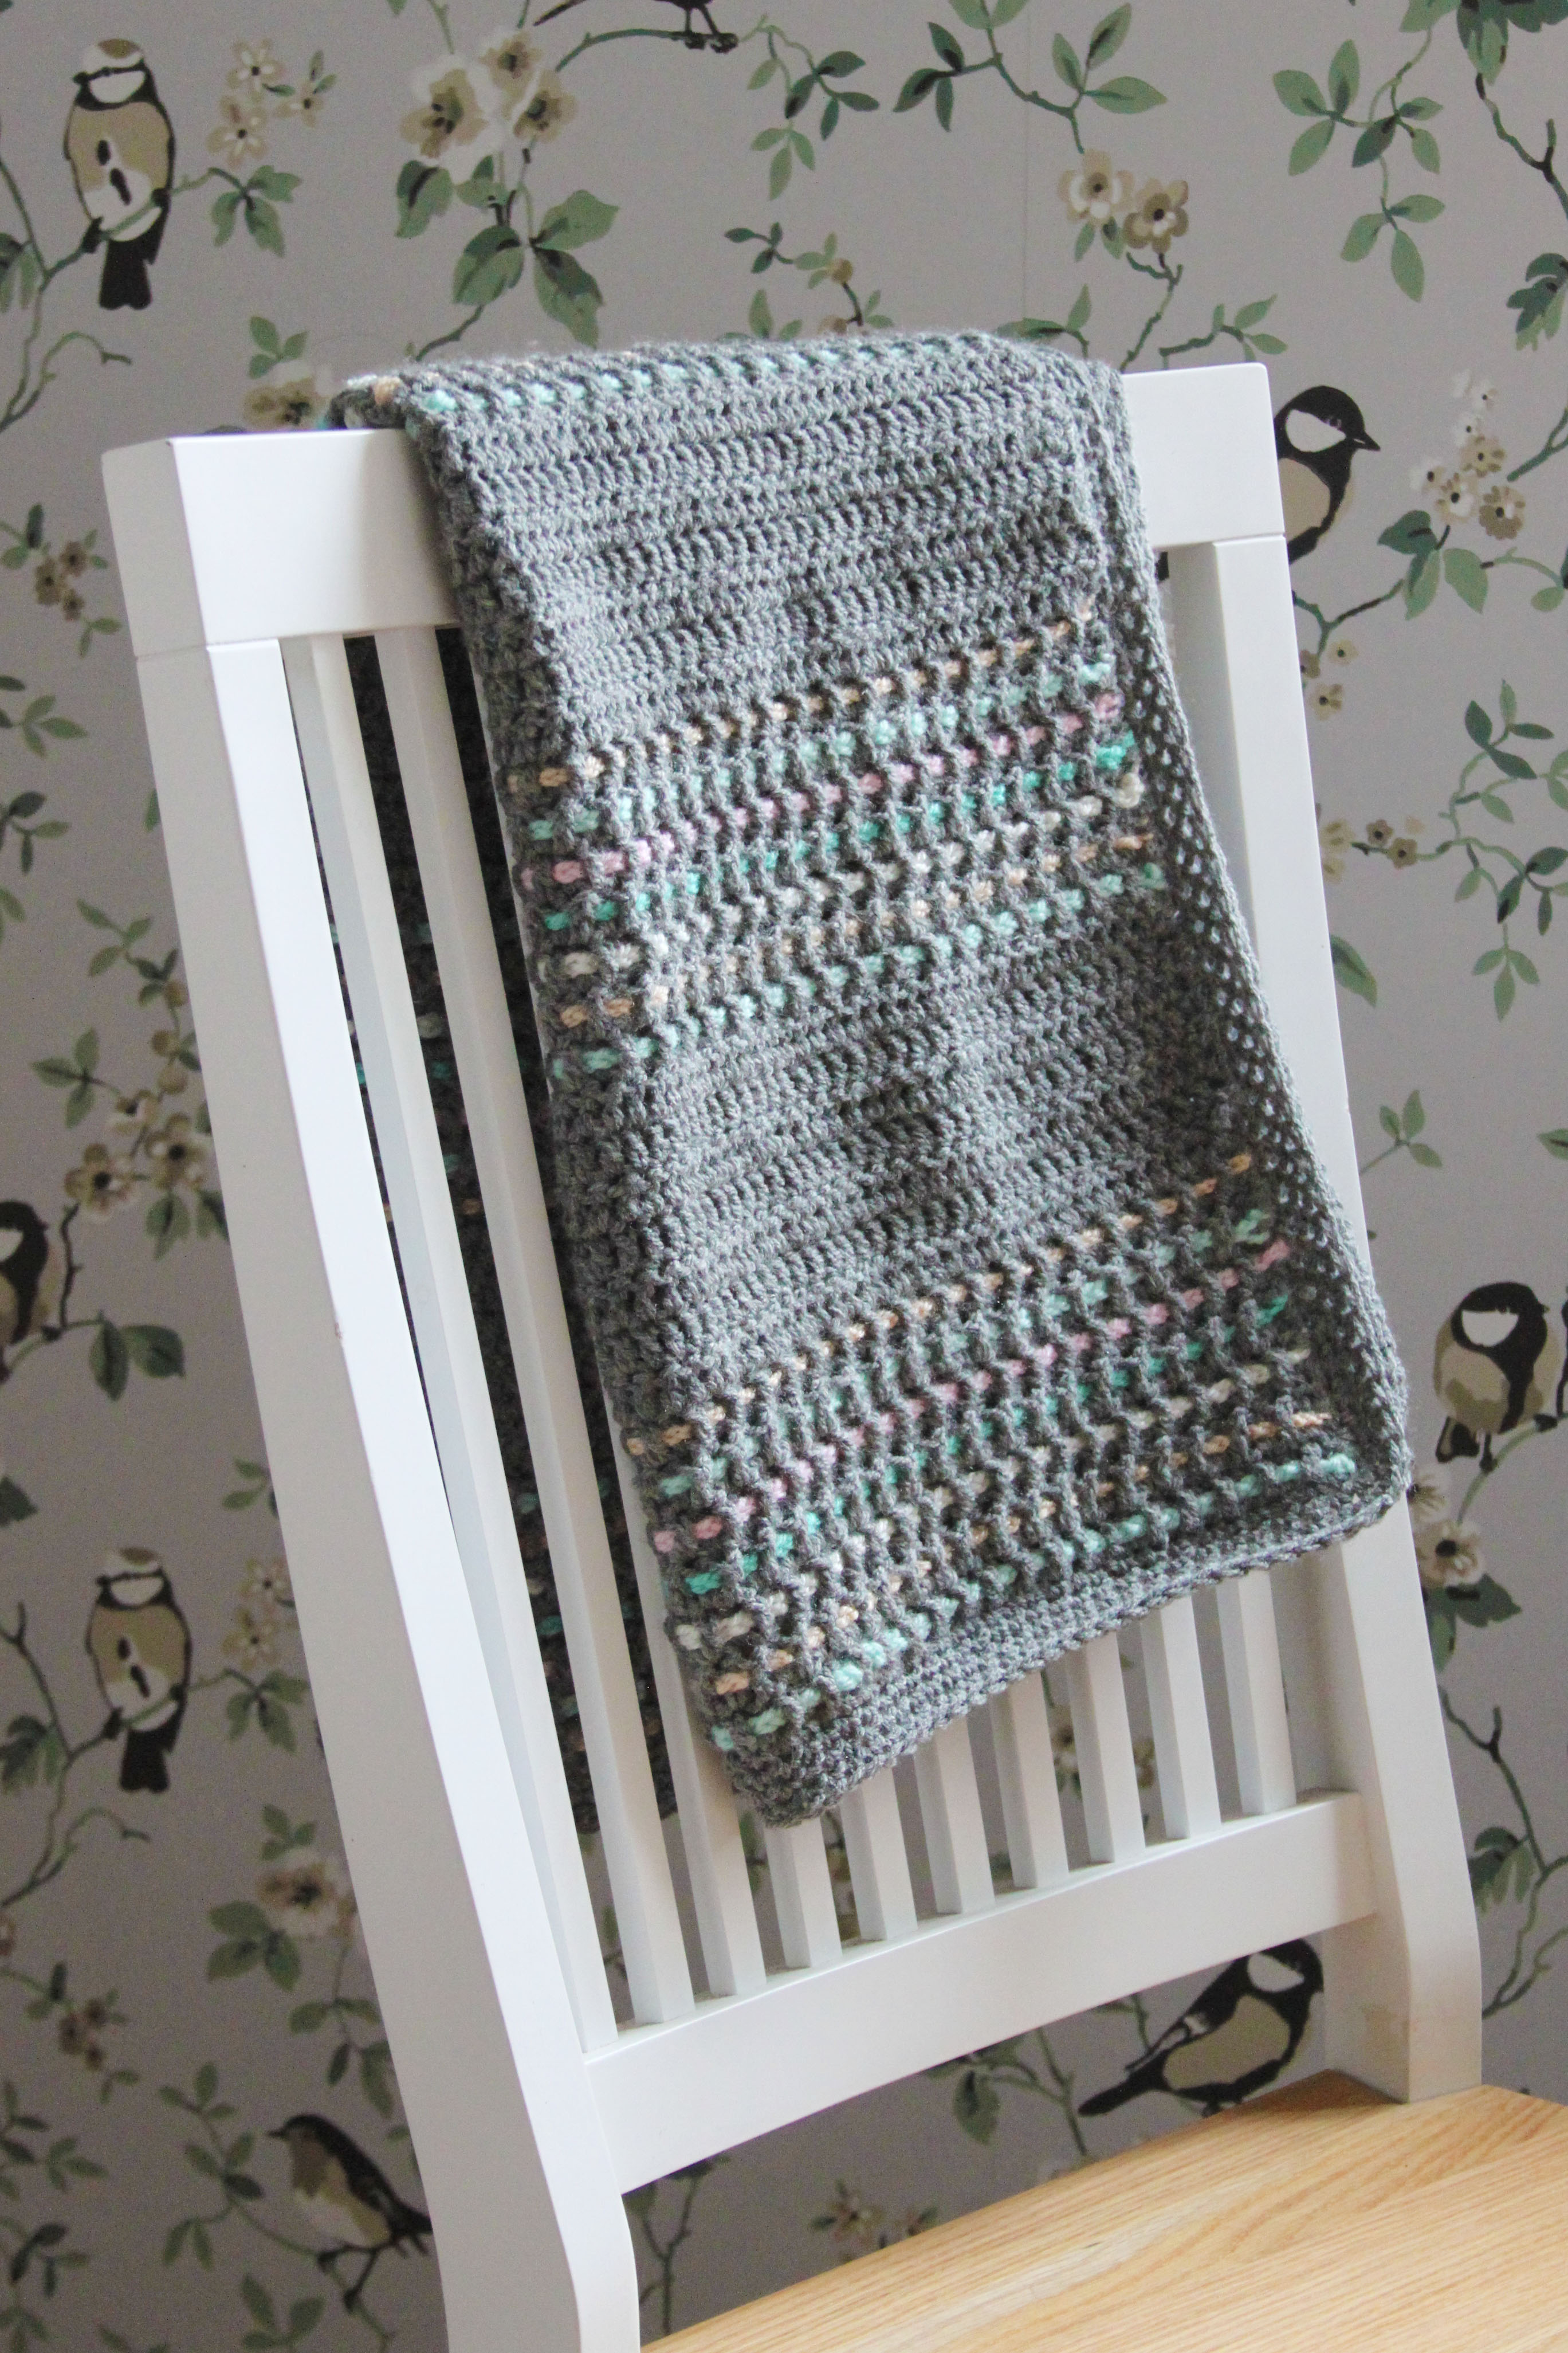
Den här pläden vikade jag till en kompis dotter som nu är drygt en månad gammal. Tanken var att den skulle passa att ha i barnvagnen nu i vår.
Jag använde mig av en lite annorlunda teknik när jag gjorde ränderna. Jag vävde liksom in långa remsor av lösmaskor mellan de grå stolparna och avslutade med några varv fasta maskor runt hela arbetet för att gömma lösa trådar och få en mer rak och stabil kant.

Så gjorde jag:
1. Virka grå grundpläd med stolpar.
Börja med att göra 75 lm.
Gör 3 lm till (detta blir första varvets första stolpe), gör sedan 1 st i varje lösmaska varvet ut. Första stolpen i varje varv består av 3 lösmaskor. Min pläd bestod av 75 stolpar som jag vikade i cirka 63 varv (men man kan välja själv hur lång man vill göra den).

2. Väv in ränder
När den helgrå pläden av stolpar var färdigvirkad började jag väva in ränderna.
Jag fäste ett pastellfärgat garn i första varvets första stolpe, sedan virkade jag ett cirka 88 lösmaskor långt snöre. jag klippte av garnet utan att fästa och trädde snöret på en hårnål. Med hjälp av nålen vävde jag in lösmasksnöret mellan stolparna och fäste i varvets sista stolpe. Sedan upprepade jag detta med fler färger och lämnade några varv orörda för att få ett grårandigt mönster.
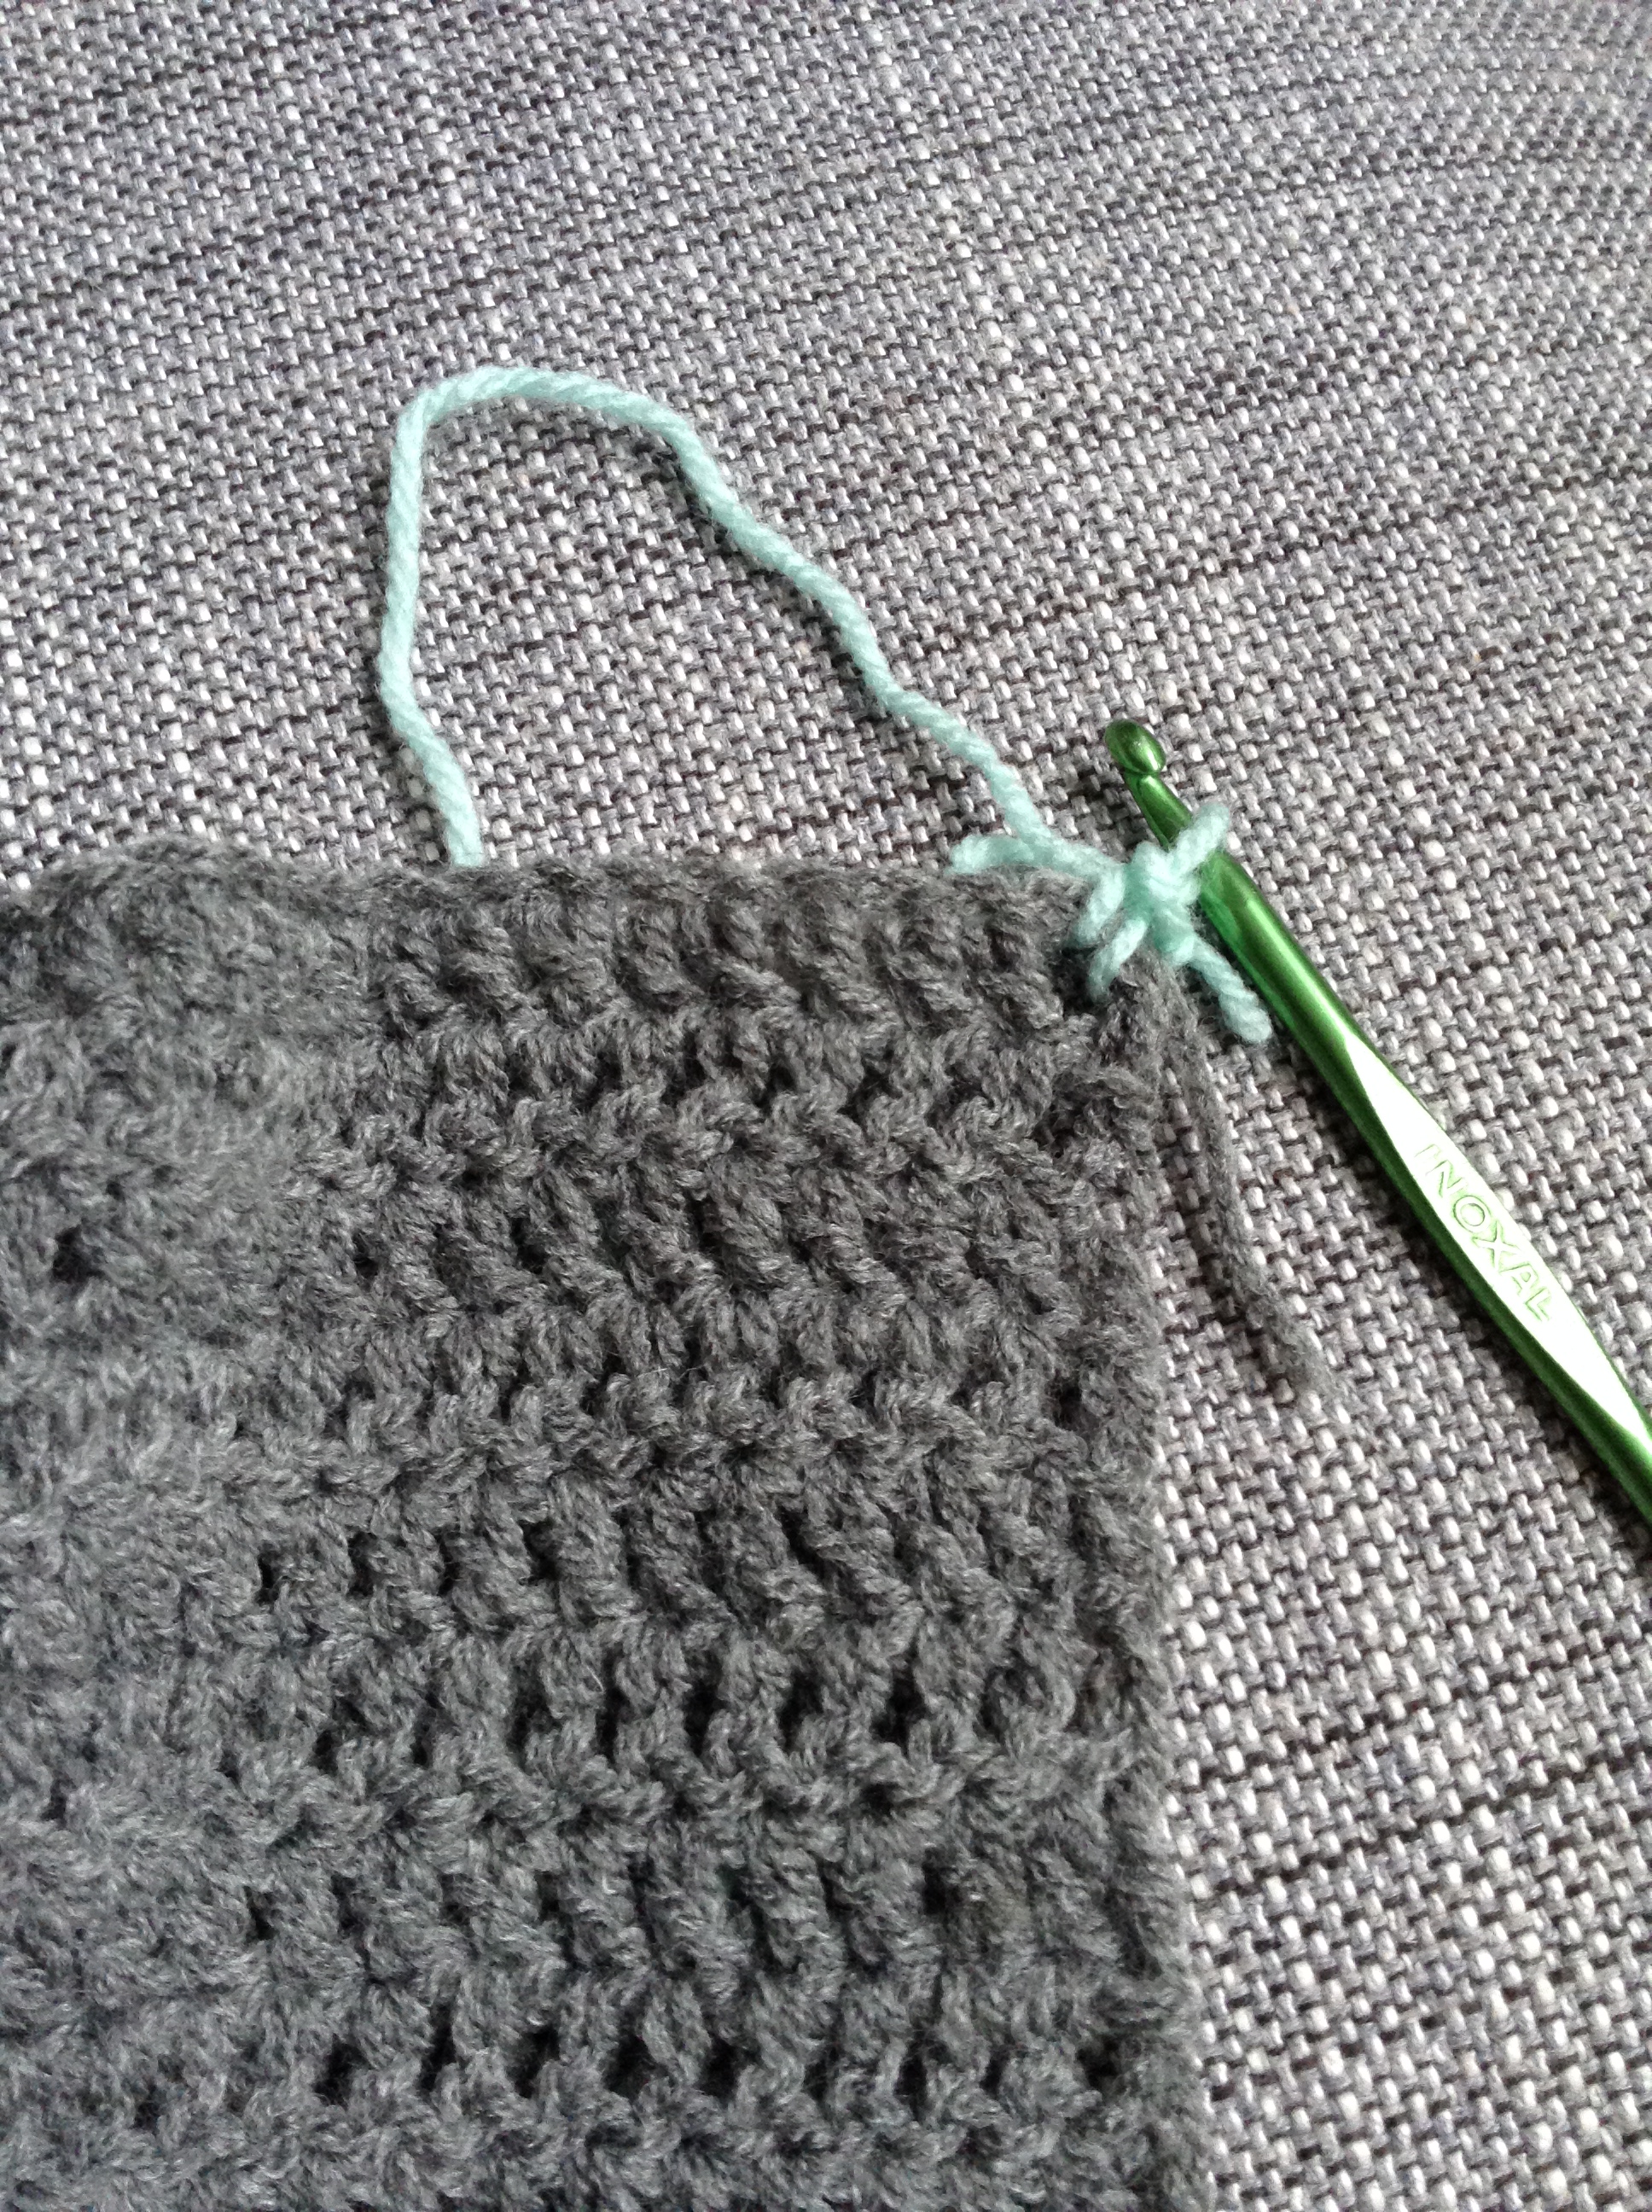


3. Gör en stadig kant
När alla ränder var klara så virkade jag några varv med fasta maskor runt hela arbetet för att få en fin och rak kant och samtidigt dölja några garnändar.


Guuu va roligt! Jag ha kikar in tusen ggr sen sist;) Jättefin pläd!! Har du instagram förresten? Kramkram/Hanna
Å, tack för dina fina ord! Ja, jag heter pysselmaggan på instagram. 😊
Beautiful!
GREAT baby blanket! Med — pleasepleaseplease – pa Engelsk? Svensk ar inte so bra…TACK so mycket!
Adorable ❤
Simple and beautiful design, thank you for sharing!
I love this blanket! Is there any way to have the pattern translated into english? What size crochet hook did you use? Thank you so much!
I haven’t translated but it looks like the pattern blanket is all dc and the colour stripe is a long chain. You should be able to get length and width dimensions by counting rows and stitches in the picture.
I need English translation. Pleas
Ch 75. Then she did 63 rows of Double Crochet (US Terms). She did the weaving with crochet chains that she weaved in. When she was done weaving, she did several rows of border to hide the weaves and anchor them. I hope this helps.
Thank you Michele!
Thank you so very much..
Lovely blanket. Directions in English please
would you kindly post instructions on the edging you did? or send them to valybr@yahoo.com – you can send in swedish – i will translate. Thank you.
I meant to say uou can sendnin swedish – i will translate.
Hej!
Jag har delat ditt pläd-mönster på bloggen ”Ett varv till med Anna” för jag har fallit för ditt mönster, även om jag inte själv har virkat den än så kliar det i fingrarna för att sätta igång.
Här hittar du bloggen
http://www.hemmetsjournal.se/Handarbete/Bloggar/Blogginlagg/?entryid=228327
Can someone translate to English?
if you open with chrome web browser – it should ask uou if uou want to translate the web page to english.
Size hook?
hi.
I am from the UK. I love your blanket. I would love if you could maybe translate this to English?
Much appreciated
Hi,
I am almost finished with this blanket, at least the main body of it. I used Lion’s Pride Woolspun (80% acrylic, 20% wool) in Anthracite from Michael’s with a J hook, 90 stitches across, and it does take a lot of yarn – like 12 balls. Had to go back for more. I used stashed yarn for the colorful chain inserts that I happened to have, just the right colors in small amounts, so that worked out well.
Now that I have progressed to the edging section, and it is quandary time! The edging on her blanket is so pretty – it looks boxy, like it is worked three or four times around, and like it is depressed or moves in a downward motion from the body of the blanket.
Pysseldrommar, please what edging stitch this is, or one that could work?
A great, modern baby blanket! And thanks again for any direction in English..
did you figure it out?
I think you need to triple up with the stitches on the corners.. Like 3sc on every corner, just search for border for square rug or table clot 🙂
I wondered what worked for you for the edging…but more important – what did you do with the ends of the stripes? Did you just knot them really tight and cut the ends? Or did you crochet over the ends (seems like a lot of ends to hide in a sc stitch…). I’d love to hear what worked for you!
I just finished this blanket for our newest baby. I did the weaved in chains in every row. To secure the chains, I brought the yarn over and weaved the ends directly into their chain. This worked out very well, made the crocheting of the border much easier… and for the poster wondering about the border. I did my border in colors from the weaved in chains, So 4 rounds of border. At each corner I did 2dc, 2ch, 2dc. my blanket squared up beautifully.
I am trying to figure out the edging as well. Can you send it to me or reply here?
Åååååååhhh…jeg liiiiker tapetet på veggen!!!! Skulle gjerne hatt;-)
Teppet er også fint men jeg har ikke noe ”smått” å gi til f.t 😉
Hilsen Annette fra sør tyskland
Thank you for sharing this idea! I made a baby blanket for my inclusion partner and it turned out great!
Lovely!
Has anyone figured out the edging?
Google Chrome worked great. I opened Pinterest and opened this page. It asked if I wanted a translation. Can’t wait to make this for my future granddaughter. Thanks for the pattern.
Moi aussi j’aimerais savoir quel point a été utilisé pour le contour du plaid. J’aimerais faire la même chose, c’est tellement beau.
Bonjour je pense que ce sont 5 rang de Mailles serrés 😉
Can this pattern be posted in English….please 🙂
Could you send me an English version of this pattern please?
Just adorable I will definitely try it, thanks for sharing
Pingback: 4 cutest baby blankets – easy crochet patterns – Bohemien
Tack för ett härligt mönster. Jag har nu virkat en för vår säng. Du kan se den här: http://garnhelena.bloggo.nu/Virkad-filt/
Got this pattern in English?
Pingback: Color stripe Blanket Crochet Pattern – Daily-Crafts
One more try on English instructions for that edging stitch
🙂 Pysseldrommer, Kan du ge ytterligare instruktioner PA ENGELSK, TAK SO MYCKET om hur man gör kant stygn du använt? Jag har slutfört filt men kan inte riktigt hitta instruktioner för en kant som har öppna, fyrkantiga och även kant du har skapat. Snälla rara?
OK – I have gone nutty tracking this edge stitch down. As this blogger hasn’t posted on this in ages, I will pinch-hit here and hopefully help someone else. I did not want to put a frilly edge on this at all, all I could find. So it took awhile to find, but near as I can tell the edge stitch used is Filet Crochet Mesh Stitch. It looks from the pictures like she substituted single crochet, rather than the double crochet called for typically in this stitch; her single crochet choice makes the edging squares tighter and smaller. Looks ”SNYGG” as they say in Swedish, and probably is best for a baby blanket.
To Place the Colorful Chains and Weave In the Ends – once the full rectangle is done, single crochet appropriate length chains using the same or one size smaller crochet hook (my colorful yarns were a tad lighter weight, so I went down one size hook). To place all your colorful chains into the body of the blanket, tie use a crochet hook to pull them thru in order, alternating stitches in the work row, four To create the anchor at the edge, cut the yarn when your chain reaches the edge, leaving about 12″ in yarn tail. Pull the tail thru the last loop in the chain.Then switch to a large sewing needle, and weave the cut end back into it’s chain in reverse direction from the anchor at the edge, to about five inches in from the edge each, and cut off.
To Crochet the Edging – single crochet (Row 1) all the way around the ends-woven-in rectangle. For Edging Row 2 (not in a corner stitch) single crochet one, chain one, then *single crochet into the second stitch, chain one, skip one stitch in the work row, and repeat from * all the way around, adding two or three stitches into each of the four corner stitches to turn the 90 degree angle, and have the blanket lay flat. Repeat three or four additional rows of Single Crochet Filet Mesh stitch as above. This creates the square, open mesh look of the edging as shown.
And that is it. Oye vey, I have picked this project up and put it down ten times, but I learned a lot trying to reverse-engineer it. I’m no expert crocheter (or pattern writer) so probably this is not the only way to replicate this blanket as pictured, but it worked for me. Will post a pic when I get it blocked out. EVENNESS and NEATNESS COUNTS on this simple project. I had too many fits and starts with this one, so I may do it again to get a pro look. All in all, though, I am happy that it’s complete, and I have some instructions to do it again.
Me encanta y con permiso, me quedo con la idea. Es preciosa
Beautiful and very creative.
Pingback: Babyboom: Häkeln für den Nachwuchs – noplonnimonni
Love your plaid, so I made one for the baby of a friend. Look here ist is: http://noplonnimonni.de/2016/06/30/babyboom-haekeln-fuer-den-nachwuchs/
Så fin filt!!
Nu vet jag inte om du kommer se denna kommentar men jag undrar hur många nystan av det gråa som krävdes? Samt vilka mått i cm filten är?
Jag väntar mitt första barn och detta är exakt filten jag drömt om.
Hej! Undrar precis samma sak som Åsa samt vilken stl på virknål du använde?
Can you give the instructions in English?
Bobbi, paste the address into a Google search box & hit enter. It should come up as the first hit. Click Translate. Some of it won’t translate if the text is in an image, but the rest of the page will read fine.
Så enkel och fin. Vilken strl på virkkrok hade du och hur många nystan gick det åt?
Do you have this in English???
Hi there. My daughter is having a baby boy in February and I want to make this blanket. It is adorable! However I am not familiar with your terms. For instance…what is a plaid?
Pingback: Häkeln für den Nachwuchs - noplonnimonni
Any chance you can translate to English?! I love this pattern and want to make one for my newborn niece!